I am recording our journey through the Classically Catholic Memory program. We are currently in our 3rd year using the program. We started out with the Alpha year, did the Beta year, and we are now in the Gamma year.
We have really enjoyed this program. I love the hands on learning and the reinforcement of our faith this program offers. I have found it very easy to take the CCM program and build on it to make a complete curriculum. I love coming up with our lessons and always look forward to completing them.
CCM is broken up into 18 weeks. I recommend spending 2 weeks on each week. This would bring your school weeks up to 36 weeks. I have found 1 week on each week is not enough time to dig into the topics, especially if you have older kids. I do add supplements to the subjects so we can learn more. You can see our curriculum & book selections for this year here.
CCM covers 8 subjects...Religion, Latin, History, Science, Math, Geography, Great Words, and the Timeline. We add onto Religion, History, & Science. We do a separate Spelling, Math and Latin program. Geography and Great Words we follow the CCM book.
So here is what our weekly CCM schedule would look like..
Week 1 & Week 2
Monday~
CCM co-op
Tuesday~
Religion
Latin
Geography
Great Words
Math
Timeline
Science
Wednesday~
Religion
Latin
Geography
Great Words
Math
Timeline
History
Thursday~
Religion
Latin
Geography
Great Words
Math
Timeline
Science
Friday~
Religion
Latin
Geography
Great Words
Math
Timeline
History
After 2 weeks, we move on to the next CCM week.
We start school at 8:00 and are usually done by 1:00, sometimes earlier.

Showing posts with label CCM Beta Year. Show all posts
Showing posts with label CCM Beta Year. Show all posts
Tuesday, August 26, 2014
Wednesday, March 12, 2014
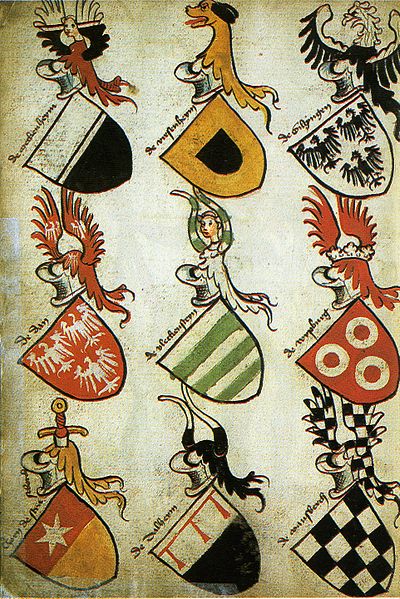
CCM Beta Year~ Shields and Coat of Arms
During co-op this week, the children created a shield depicting their own coat-of-arms.
Knights had to understand the system of badges, called Heraldry.

Each knight had their own personal badge. These badges would help identify the contestants during the mock battles. They would also identify each other during real battles.
Knights would have these badges painted on their tunics, coats, shields, and armor. They would decorate their horses with their badges.
There were 5 basic colors that were used-- blue, red, black, green, and purple. Two metals, gold and silver, were used too. Various patterns would be used to decorate their shields. A variety of animals would be used, like elephants, lions, ermines, vairs, eagles, and serpents.
In art class, the kids were encouraged to create a coat of arms that describe them.
Princess P made a pink and blue shield with hearts and stars.


Knights had to understand the system of badges, called Heraldry.
Each knight had their own personal badge. These badges would help identify the contestants during the mock battles. They would also identify each other during real battles.
Knights would have these badges painted on their tunics, coats, shields, and armor. They would decorate their horses with their badges.
There were 5 basic colors that were used-- blue, red, black, green, and purple. Two metals, gold and silver, were used too. Various patterns would be used to decorate their shields. A variety of animals would be used, like elephants, lions, ermines, vairs, eagles, and serpents.
In art class, the kids were encouraged to create a coat of arms that describe them.
Princess P made a pink and blue shield with hearts and stars.
Lego Man created a Viking shield.
Coat-of-Arms were passed down from father to eldest son.
They became the family badge.
CCM Beta Year~ Shields and Coat of Arms
During co-op this week, the children created a shield depicting their own coat-of-arms.
Knights had to understand the system of badges, called Heraldry.
Each knight had their own personal badge. These badges would help identify the contestants during the mock battles. They would also identify each other during real battles.
Knights would have these badges painted on their tunics, coats, shields, and armor. They would decorate their horses with their badges.
There were 5 basic colors that were used-- blue, red, black, green, and purple. Two metals, gold and silver, were used too. Various patterns would be used to decorate their shields. A variety of animals would be used, like elephants, lions, ermines, vairs, eagles, and serpents.
In art class, the kids were encouraged to create a coat of arms that describe them.
Princess P made a pink and blue shield with hearts and stars.
Lego Man created a Viking shield.
Coat-of-Arms were passed down from father to eldest son.
They became the family badge.
Thursday, February 27, 2014
Discovery Museum Field Trip
This past Monday, we went on a field trip with our CCM homeschool co-op. We visited our local children's museum. It's small but the kids really enjoyed it. We had the children signed up for two different classes.
The younger kids, grades Prek-2nd, were signed up for a class about water called Water, Water Everywhere. The older kids, grades 3rd-6th, were signed up for a class about wind and weather called Wind and Weather.

Both museum educators were amazing with the kids. They kept the energy up and really involved the children in the learning process. The asked questions that would lead the children to think and come up with the answers to the scientific experiment being done. I sat in on the older kids class. They learned about pressure and how clouds are formed.

After the class, the children were able to roam about and play in the museum.

There were displays with gears, an apple packing plant that utilized simple machines like levers and pulleys, the kids could build their own roller coaster, a hospital area with an ambulance and a rock climbing wall.

Do you have a science or children's discovery museum in you area that you enjoy?
Leave a comment and let others know about it. Road trips are always fun!
The younger kids, grades Prek-2nd, were signed up for a class about water called Water, Water Everywhere. The older kids, grades 3rd-6th, were signed up for a class about wind and weather called Wind and Weather.

Both museum educators were amazing with the kids. They kept the energy up and really involved the children in the learning process. The asked questions that would lead the children to think and come up with the answers to the scientific experiment being done. I sat in on the older kids class. They learned about pressure and how clouds are formed.
After the class, the children were able to roam about and play in the museum.
This museum is relocating to a new facilty in April. It will be larger and will have more exhibits. We are looking forward to going back with friends to discover some new exhibits and have some more adventures.
Leave a comment and let others know about it. Road trips are always fun!
Discovery Museum Field Trip
This past Monday, we went on a field trip with our CCM homeschool co-op. We visited our local children's museum. It's small but the kids really enjoyed it. We had the children signed up for two different classes.
The younger kids, grades Prek-2nd, were signed up for a class about water called Water, Water Everywhere. The older kids, grades 3rd-6th, were signed up for a class about wind and weather called Wind and Weather.
Both museum educators were amazing with the kids. They kept the energy up and really involved the children in the learning process. The asked questions that would lead the children to think and come up with the answers to the scientific experiment being done. I sat in on the older kids class. They learned about pressure and how clouds are formed.
After the class, the children were able to roam about and play in the museum.
There were displays with gears, an apple packing plant that utilized simple machines like levers and pulleys, the kids could build their own roller coaster, a hospital area with an ambulance and a rock climbing wall.
Do you have a science or children's discovery museum in you area that you enjoy?
Leave a comment and let others know about it. Road trips are always fun!
The younger kids, grades Prek-2nd, were signed up for a class about water called Water, Water Everywhere. The older kids, grades 3rd-6th, were signed up for a class about wind and weather called Wind and Weather.
Both museum educators were amazing with the kids. They kept the energy up and really involved the children in the learning process. The asked questions that would lead the children to think and come up with the answers to the scientific experiment being done. I sat in on the older kids class. They learned about pressure and how clouds are formed.
After the class, the children were able to roam about and play in the museum.
This museum is relocating to a new facilty in April. It will be larger and will have more exhibits. We are looking forward to going back with friends to discover some new exhibits and have some more adventures.
Leave a comment and let others know about it. Road trips are always fun!
Subscribe to:
Posts (Atom)